

Thunderbird is a free email program for reading, sending, and managing emails. It includes numerous additional features such as a calendar and an address book and can be extended very flexibly with plugins.
A major weakness of Thunderbird is sending newsletters. There is no built-in function for creating, sending, and managing emails like real newsletters.
With an extension, however, this shortcoming can be fixed very quickly and easily, allowing Thunderbird to be used comfortably and professionally for sending newsletters or bulk emails.
At this point, it is assumed that the email account intended for sending the newsletter has already been set up in Thunderbird and can be used to send emails.
If this is not the case, the instructions on this page explain how to set up a new email account in Thunderbird so it can later be used for sending newsletters.
Sending bulk emails and newsletters with Thunderbird and Mail Merge in 4 steps
There is a free extension for Thunderbird called Mail Merge. The following steps use this extension to turn Thunderbird into a newsletter delivery system.
Step 1: Install Mail Merge
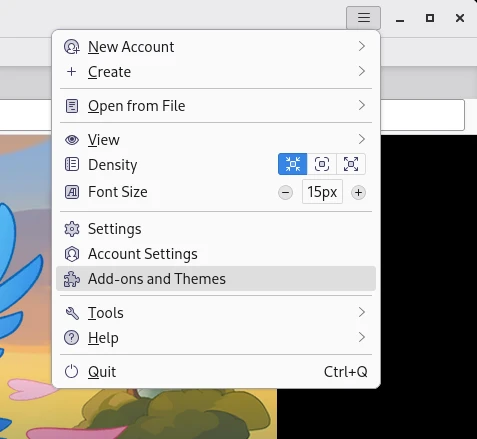
First, you need the Mail Merge extension. It can be easily installed via the Thunderbird interface. To do this, open the "Add-ons" item in the main menu:
There is a search field at the top of the "Extensions" page. Enter the term "Mail Merge" to find the extension in the Thunderbird database for add-ons:
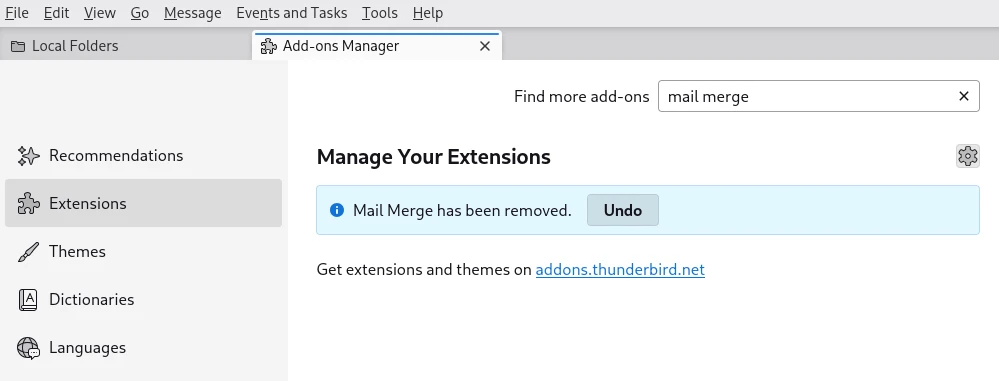
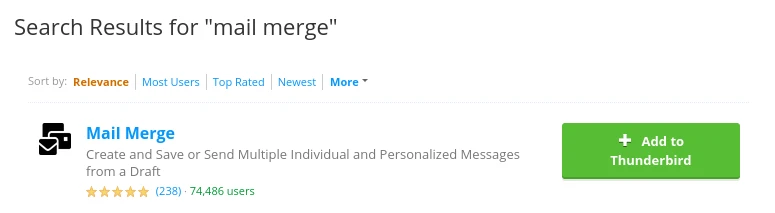
Once the extension has been found, click on the "Add to Thunderbird" button on the right-hand side to automatically install and activate it:
Step 2: Create a recipient list
To send the newsletter to multiple recipients, a recipient list is required. A special aspect of this guide is that newsletters are sent with personalization.
Personalization means that each email addresses the recipient personally, for example by first or last name. For this guide, the following details are required for each recipient:
- Email address
- First name
- Last name
Personalization is optional but highly recommended, as it makes the newsletter feel more personal and gives the impression that it was created exclusively for each recipient.
The recipient list was created using the free LibreCalc program. This program is part of the LibreOffice suite, a collection of programs for typical office tasks. To create the recipient list, first open a new spreadsheet document.
The following three fields are required, each in its own column:
- FirstName (recipient's first name)
- LastName (recipient's last name)
- Email (recipient's email address)
Below that, a new recipient can be added per row. The example file looks like this:
The file can also be created using a simple text editor. It is important to separate the data records with the separator ";" and to enter only one recipient per line. Finally, the file must be saved with the extension .csv.
The text file can have the following content:
Max;Mustermann;[email protected]
Silke;Mustermann;[email protected]
...
When saving the list, care should be taken to assign a unique name and save the file in CSV format without errors.
If the content is formatted similarly to the example above, the recipient list is complete and the next step can be taken.
Step 3: Create a new newsletter in Thunderbird
The next step is to create a newsletter that can be sent using Thunderbird. To do this, first create a new email. The process is the same as sending a normal email with Thunderbird.
The following placeholders can be used in the subject line and body of the email:
- {{FirstName}} — recipient's first name
- {{LastName}} — recipient's last name
- {{Email}} — recipient's email address
An example of a personalized email looks like this:
Hello {{FirstName}},

I've published a new article on the blog,
where I reveal how you can build muscle mass
without equipment.

If you're interested, read the article:
[Link to article]

Best regards,
[Name]
It is important that one of the following formats is used in the recipient line:
- {{FirstName}} {{LastName}} <{{Email}}>
- {{FirstName}} <{{Email}}>
The name and email address are dynamically taken from the recipient list when sending and used in the recipient line.
No static data may be entered in the recipient line. Only the placeholders from the top line may be used.
Personalization works in both the subject line and the body of the email.
Step 4: Send the newsletter immediately or later
Now the newsletter can be sent to all recipients. To do this, select Tools → Mail Merge from the menu that opens in the menu bar of the Thunderbird window when you are writing a new email.
A new window opens with the Mail Merge shipping options, where you can select the recipient list and shipping time, among other things. Select "CSV" as the source and select the recipient file that we created in one of the previous steps.
The following settings must be configured to enable sending:
- Source — select CSV
- Delivery mode — choose whether the newsletter should be sent now or later
- File — select the recipient file created earlier
- Character set — UTF-8
- Field and text delimiter — as shown in the image or adjusted as needed
Once all the details have been entered correctly, click on "Send" to prepare the newsletter for dispatch. Alternatively, you can also send it manually at a later date.
After saving the newsletter, a new folder labeled "Templates" will appear in the email inbox menu. This folder contains all newsletter templates that can be edited or used to send future newsletters.
Conclusion
All steps in these instructions were implemented and documented as described. The newsletter was successfully sent to 10 recipients. Sending to small distribution lists with up to 100 recipients should also work.
Please note that restrictions may apply when sending to more than 100 recipients. The newsletter will still be sent via a normal email provider such as GMX, Gmail, or Outlook, which may throttle or even refuse delivery.
This means that sending may be blocked after only about 20 recipients. It is therefore advisable to send in small quantities.
For example, you send ten emails, wait a few minutes, and then send another ten emails. This is the safest way to ensure successful mass mailings with local email programs.
If an email clearly looks like a marketing email containing advertising, it must include contact details of the sender, an unsubscribe option, or a revocation option. In addition, the recipient's consent is required before the email is sent.
For larger distribution lists, it is advisable to use professional newsletter software or a corresponding service in order to be able to reliably send newsletters to hundreds or thousands of recipients immediately.
GetResponse is recommended as professional email marketing software that is best suited for mass emails. It can be used to send small newsletters, as described in this guide, completely free of charge.